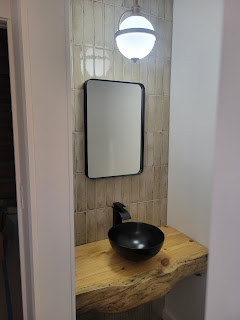
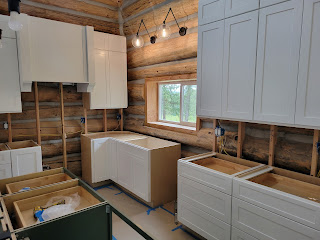
Sunday, July 26, 2009

Wait...what is this? A new post?

About time I guess. We've been enjoying having some free weekends to go biking & golfing.

Most of the inside trim (door & window casing, baseboards etc) is finished & clear-coated.

Here's some trim around the stairs:

More trim going up the stairs, we tried to "show off" some of the girders & RPSL's where the drywall butts up to them. Gives it a different look, since the logs aren't milled to 1 size, you can see the taper & character.

Here's our front picture window with trim on it (and a bit of chinking on the outside still!)

Down bath:

Used some small 1/2" x 1" poplar trim for around the 4x10 beams for the second floor, also handy as we used it where drywall butts up to RPSL's & girders.

Dining room, we still have to find a matching island to go in the front corner of the kitchen for more cabinet & counter space.

We finally started trim on the outside of the windows. We used the same stain as on the gable ends, these ones were stained just a day or two ago, the 'yellow' mellows out alot in a few weeks.

Friday, April 24, 2009

Couple new pics

I've been busy with work now that it's warm again, sorry for no updated pics!

Here's the kitchen, we finally received the fridge that was ordered, much better than the mini fridge we were borrowing :)


Here's what our interior doors look like, they are maple (wanted poplar, but too $$) & shaker-style 2 panel.
The trim & baseboards are all poplar.


Here's the closet doors in the downstairs bedroom:


Just have 1 window left to trim, and the upstairs baseboards, then to the outside stuff, porch etc.

Friday, April 10, 2009

Moved in!!

About a year and a half later, we have officially moved in!

The final inspection went fairly well, we have a couple minor things to fix so the inspector is happy.

We are finishing up with trim & baseboards, all the interior doors are in & trimmed out as well. We'll start on the outside porch & entryway once all the inside is completed & moving boxes unpacked :)

Pics to come soon....

Tuesday, March 24, 2009

Lighting & other stuff

So after looking at several stores around Indianapolis and not finding exactly what we were looking for we finally decided to look online. We found this great website called Lighting Universe and was able to find something!

Our electrician is out this week finishing all the electrical stuff, switches, plugs & such.

Here's the front done with the doorbell & outside light: We picked up our custom door bell while we were at our good friends Stacey & Travis's wedding in Cannon Beach Oregon.


Here's the dining room light, and you can see I finished the trim around the side door. We had to use 5" wide poplar in order to hide the switch wiring.


Here's the hall light, there's another around the corner. As you can see we still have no interior doors. They are supposed to be done on Friday.


Here's a window all trimmed out:


The dirt guys are also out, we are tired of having no room to park 2 vehicles & trying to back out in the dark, so we had them circle the drive back around, nice & wide so there's some places to park too.

Saturday, March 21, 2009

We have an address :)

We used a small piece of left over poplar from the window trim to make an address mounting board. I ran my router around the edge to give it a bit of definition, then Jessica stained it & placed the numbers. Turned out good for $3.97 I think :)
We'll do the same for the doorbell & outside lights.


We also put in a mailbox, I plan to make a "custom" one that matches the house theme, but no time for that now so it'll have to wait:

Tuesday, March 17, 2009

Stairs finished, & carpet in

Jessica & I cut all the angled balusters on the weekend, and I installed them yesterday after work.

Everything turned out great, the railing is nice & solid & it looks good. Just have to give it a clear-coat.


The carpet guys finished everything on Monday as well. It's nice to have something soft to walk on.

Master bedroom:


Upstairs living room:

Friday, March 13, 2009

Stair building 101

Our stair parts finally came in, so I picked them up the other day after work, along with all our trim (window + door casing, baseboards)
It's all poplar, same as the 4x10 beams so it should look good once it's all installed & stained.

The newels attach using a long 2 sided bolt, 5" lag on one side, & threaded on the other. The newel had to be drilled to slide over these.


Here is the lag bolt installed in the floor, it goes through the 2x6 T&G, into the 4x10 beam below.


Here is a close-up showing the curved washer & nut that secures the newel post tight to the floor. This nut is a pain in the butt to tighten, as the 1 1/2" hole in the newel post only allows about an 1/8 of a turn every time. The good thing is these are very solid once tightened. The newel overhangs because we plan to put a small piece of trim on the edge, to cover the cut ends of the 2x6 flooring.


Balcony newels installed:


So far I've figured out, estimate the time to install all the stair parts, then multiply that by 10. It's time consuming & tedious, but I'm sure it'll turn out nice.

Today we finished all the balcony rails:


Jessica started on finishing the trim:

Monday, March 2, 2009

Kitchen Backsplash

We found some 4x4 white travertine stone(limestone type material that is harder than limestone but softer than marble). It's "tumbled" so it has soft edges & very random. Seems to fit in well with the logs & such.


Here is the backsplash with the grout freshly finished. Jessica does a great job with the tile grout. (More attention to detail than me!).


Notice anything different (other than the grout)?


We had to "find" the outlet that I accidentally covered with cement board & tiled over. Luckily I had a picture with the framing that showed it, & we were able to pop off 2 tiles, the grout them back on after cutting around the box.

Sunday, March 1, 2009

Kitchen backsplash & more cleaning

The hardwood flooring is all done finally, haven't taken a decent picture because it needs the dust cleaned off :)
We also scrubbed some more chinking off the logs, only a closet to go, then it's all done.

I started the kitchen backsplash today after cleaning a bunch of garbage out of the front of the yard.
Put in the last 2 electrical boxes, then installed some 2x4 blockings, and put up the cement board (Durock).


We had about 2 extra boxes of tile from the kitchen floor, so we cut them down to 4x4 tiles & planned to use those. The tiles weren't the same size, & after the first row I could tell it just was not going to look good. We pulled them off & cleaned the mortar off.

Will be buying some other 4x4 stone to put up instead. Will hopefully get this finished up after work, by then our stair railings should be in.

Saturday, February 21, 2009

Hardwood Installation

Hey everyone,

Tired of looking at the toilet yet? hah.

Last weekend Mark (coworker) came down to help us get started properly laying the hardwood flooring. He has done alot of flooring with his Dad, so it was a huge help having him come down & help for the day. Thanks again Mark!

Today we laid another 11 boxes of flooring. We have about 120SF left to finish tomorrow.
This is 3/4" solid Hickory. So far it's looking great (don't mind the dust). Tim came down to help, thanks!

It's mostly light colored, but alot of grain & variation, seems to fit well.

Thursday, February 12, 2009

Plumber is here again.

We were finally ready to call Gary the plumber back so he could do his finish work.

I never thought I'd be so excited to hear the sound this made :) Haha, it will be much nicer than using nature. I think Jessica is happier than I am. Marley say's hi, little guy wouldn't stay in the picture for me.


Here's our water heater (free from the REMC, thanks!), no hot water yet until electrician wires it up in the panel.


We even have a working (cold) shower:


Here is next weekend's project, hardwood flooring. Hopefully by then the stair railings will be in.

Sunday, February 8, 2009

Weekend work

Jessica spent the weekend cleaning chinking off the inside logs. Fun job :)

I spent most of the weekend in the crawlspace insulating the floor.

We had a freak heat-wave, all the snow melted & it was close to 50, so I stopped by the local plumbing shop, & picked up the proper connector to attach the water main to the meter.
It was a 'bit' muddy but I got it hooked up, no leaks.


We also finished the guest bath vanity top + faucet. We had a different faucet picked out, but it was a 4" center, the top we bought was 8", so we returned the faucet & found one similar that fit better. Almost ready for the plumber...

Tuesday, February 3, 2009

Vanity top....

We found a decent deal on solid-surface vanity tops. The sinks are built onto the tops from below. I took them down tonight & worked on the double upstairs. The single was chipped on the corner so have to return it.

I installed the faucets first since it just looked easier to do it before mounting the top. They are made by 'Cifial', found a good deal on a pair of them, worked out well.


Have to run some silicone around the top edge still where it meets the wall, & the drawer doesn't fit in-between the sinks (oval sinks a bit wider??...) but almost done.


Getting closer
:)

Sunday, February 1, 2009

Cabinets & countertops.

Our friend Mike helped us move the granite counter-top after work on Friday night. Heavy stuff is all I have to say, well over 300 lbs from my calcs. Thanks for the muscles Mike :)

We finished the cabinets today. We need to find a matching piece of glass for the doors on the right side, and need to have a 30" countertop cut down to 15" for the cabinet base I shortened:


Here's a closeup of the granite, & the undermount sink. We still need to figure out how to finish the backsplash area. Likely some kind of tile or stone of some sort. Any idea's??


Southern Indiana actually got a decent amount of snow for a change, over a foot in a about 24 hours. We had lots of animals enjoying the yard this weekend, a few dogs & a deer or something that chewed under our lumber pile to get some fresh grass.

Sunday, January 25, 2009

Kitchen Cabinets

We loaded all the base cabinets (except 1) & took them to the house. The 2x4's against the log wall worked great, the cabinets all lined up perfect & it was easy to secure them.


There is one more base cabinet to install, but when we found these (display in a local kitchen shop) the other base was a 30". We only have room for a 15" between the stove location where the wire is coming out of the wall) & the fridge (beside the tall cabinet). I dis-assembled the 30" upper cabinet & shortened it this afternoon, just have the base to finish, then onto the countertops.

Saturday, January 24, 2009

Vanities & cabinets

We installed the bath vanities today, the hardest part was getting the 60" vanity upstairs!

Here's the 24" in the downstairs/guest bathroom. They are natural maple:


We took an idea from another LHBA member, we used 2x4's against the log wall, so we would have something "plumb & square" to install the other kitchen cabinets onto.

We found the area/log that stuck out the farthest, which happened to be right in the corner where the framed kitchen wall butts onto. Then we installed the first 2x4, & plumbed it using shims of various sizes. Then we snapped a line that was square along the floor, & installed the rest of the 2x4's, each one centered where a pair cabinets will join, so there is a solid area for each to be secured.
Will see how well the idea works tomorrow when we start installing the kitchen cabinets.

Sunday, January 18, 2009

Tile is finished

We had a week away from working on the house, since I was in Canada for meetings & training.
Was good to see everyone again.

We rented a tile saw on Saturday & used it for all the pieces around pipes, registers etc.
Today we grouted everything, wasn't too bad, other than a lot of bending down & kneeling.

Here's the downstairs bathroom finished (needs a final cleaning/buffing to get the haze off).


Here's the kitchen, really needs to be buffed clean :) The actual color is closer to the tile on the very right near the log wall.


Our bath vanities are in, so those will go in next, along with all kitchen cabinets.

Sunday, January 4, 2009

Painting + tile

Don finished up with the painting & it looks great, the cut-in lines along the ceilings are near perfect. Here's a shot of the downstairs bedroom, with the finished ceiling we did the other weekend.


Here's the tile in the utility room & downstairs bath. We still need to rent a tile saw to make the detailed cuts around registers & pipes etc, then will finish the grout after that.


Bathroom tile, still needs a few tiles cut:


Today we tiled most of the kitchen. We picked a neutral color that should go well with the hardwood flooring & cabinets.

Sunday, December 28, 2008

Update finally

The drywall guys are done, & they were nice enough to leave the scaffolding for us to use until their next job. We spent a couple days doing the last of the "high" work while we had a chance.

We bought ceiling fans that have remote control, since both fan's are quite high. All the new sheetrock has a coat of primer on it as well.


We also put a clear finish on the ceiling (4x10's + 2x6 T&G flooring). We didn't want to darken things up too much, so we used a clear waterbased poly in a satin finish, so it's not too shiny.

Here's a before (from a while ago):


Here's after we finished 2 coats (tired arms!):


Here's a couple cool pics from today & yesterday:


Sunday, December 14, 2008

We have walls :)

Well, we had walls before, but they look more like walls now. After seeing the framing for so long now, I was quite surprised how different everything looked when we walked in the door on Saturday.

Future kitchen:


Downstairs bedroom:


Upstairs:


Master bedroom:


Master bath:


We only have 1 more day of chinking left, so we're looking forward to that.
Next weekend we hope to have all the walls primed & painted as well, then onto flooring & cabinets.

Tuesday, December 9, 2008

Drywall is delivered

We found a drywall crew that will install & finish all the interior walls & ceiling.
The supply guys showed up this morning & brought in all the sheetrock. The nice thing about not getting it from a standard "big box" home store, the drywall can be ordered in larger sheets.

Here's some for the ceiling, 16' long, wow!


We also taped off some logs using blue painters tape, (an idea from Chris the other weekend).


Here's a picture that shows a couple rows of each, some that were taped, & others that weren't.
The taping takes a bit of time, but not having to clean the logs after is worth it!! (I labeled each that were taped and not taped)


Hopefully by the weekend we'll have the drywall done.

Sunday, November 30, 2008

Chinking, chinking, & more chinking...

For the last two weekends we have been busy chinking the inside of the house. We have accomplished quite a bit, it seem to be going much faster than when were were chinking the outside. It might have something to do with working off of floors and it not being 90+ degrees outside.

We had quite a bit of help this weekend, and it was nice having an extra day due to the holiday. On Friday and Saturday Travis ( Log Home Builder Member KingLewey70) came down to help. It turned out that he was quite the chinker, even though it was the first time he had ever chinked. He is welcome to come and help anytime.

On Sunday we were pretty chinked out and decided to clean up the logs a little. For those that have never chinked before, it is a very messy and dusty task. No matter how hard you try to keep the lines perfect and the excess chinking off the other logs it seems to make it's way there. Another Log Home builder member Chris (ribbonevt) came to check out our progress and lend a hand. Chris had a great idea that we are going to try out next weekend. He suggested that we use blue painters tape above and below the chink line, should help with the extra chink that gets everywhere!

Here are some pictures of us cleaning:


More inside chinking near living room:


Thanks for the help guys!

Thursday, November 20, 2008

Utilities trenched!

The excavating company came out today to run the main power from the street to our meter base.

They were also nice enough to trench our water line in as well, & helped me get it into the crawlspace, nice guys!

Digging near the water meter:


48" deep trench for water supply, he was flyin' through our rock-free dirt.


Here's another angle....


After this, they trenched another along the treeline for the A/C & phone cable.

We'll be able to fire up the furnace soon & get the drywall guys starting.

The REMC was out the following morning & wired up the meter, we have real power!

Saturday, November 8, 2008

Insulation

Last week we had the inspector out for the rough-in inspection, it turned out that there were still some things that we needed to do before he would give us the okay to continue. Things like fire caulking, dryer vent, and also a few things that the electrician failed to do. It probably did not help that we were not there when the inspector arrived. He tripped the temporary security system which we put in to prevent thieves from stripping the wire and copper out of the house. After we finished those repairs last weekend we called the inspector and had him come out again this week, and he gave us the okay to move forward.

It seems that there are so many little things to do when building a house. Given that this is our first house and neither of use has any experience (other than google), it would be helpful if someone were to write a book that gave detail instructions on how to build a house starting with digging the footers to the final inspection.

We called the painter out to put the finishing clear coat on the logs and insulated the roof. We decided to go with a satin finish for the clear cote. It will help with the protection without making the logs overly glossy. Once that is done we are looking forward to nailing, insulating and chinking the inside...lol.

Inside logs stained (High Sierra Applewood) & clearcoated (Sashco Symphony)

Saturday, October 25, 2008

Stain, stain & more stain.

We had Don come out to stain the inside logs, we used the same stain as the outside, & will be putting on a clearcoat in a week or so. Finished 2 coats of stain by the end of the day.

Today we stained the front board & batten before it gets too cold out.
Started:

Finished:

Sunday, October 19, 2008

Raffter Vents and Soffits

This weekend was a weekend of building a soffit and installing rafter vents.

We decided that the best thing to do for the log girder was to build a Soffit around it to protect it from Moisture. It will also allow us to hang the vanity lights without having to mount them to the logs.


Jeff also installed the rafter vents, which turned out being a pretty easy project. The vents are thin styrofoam strips that are placed between the rafters and stapled on. This is done to allow air flow between the roof overhangs and the ridge vent, without the vents there could be a possibility of moisture troubles. The insulation will go over the vents and secured to the rafters.

Saturday, October 11, 2008

Back to Work!!!

We have not been out to do any work for about 4 weeks, do to Jeff being in Oklahoma for work. There is a lot of things that we need to get caught up on. This weekend we decided that we would finish some things that need be completed in order for the rough-in inspection.
So we worked on installing the attic ladder, dryer vent and sump pit. On Tuesday we will call the inspector to schedule the rough-in, keep your fingers crossed that everything goes well.

Here's the attic ladder installed for access into the closed-in loft:


Here is Jeff putting the sump pit in after he dug the hole.

We also started closing in the crawlspace. We intend to finish it with cultured rock, and will probably get around to it this spring. There were so many spiders underneath that I let Jeff put the bracing up.


All in all I think that we had a pretty productive weekend!

Sunday, September 14, 2008

Board & Batten Finished

Finished the Board & Batten on the gable ends this weekend. Also completed the sanding inside to prep for staining.

Sunday, September 7, 2008

Board & Batten started

One of the last major things on the outside was to finish the gable ends. Getting tired of looking at the "84 Lumber Tyvek" up there.

We picked up 1x12 #3 pine boards, & 1x2 #1 grade battens from a local Menards, not a bad price & better quality then other lumber yards.

Saturday we installed all the 1x12 boards, I was on the ladder nailing & measuring, & Jessica was doing all the cutting on the miter saw down below. We started on the back side of the house.

Once all the 1x12's were up, we nailed the 1x2 battons along the bottom & up along the roof line. Then we added the vertical pieces in-between.


Here's the back side finished, it was getting a bit dark so the picture is fuzzy.

Next weekend we'll tackle the front.

Sunday, August 31, 2008

Outside Chinking DONE!!!

We finally finished the outside chinking this weekend!!!
Tim was out to help again, thanks buddy :)

This was Saturday finishing the front:

We are officially done the outside chinking Sunday afternoon:

Still waiting for some grass to grow since all the dirt work & septic/drainage is done.

Here's the electric mixer we used, its a Minimix150 (found it used on craigslist).

Sunday, August 24, 2008

Guttters installed, & more chinking....

We finally had gutters installed on the house last week. Now the crawlspace should stay nice & dry without all the water falling around the house.
The guys were in & out in about 4 hours, not too bad.

We finished chinking this side of the house this weekend as well:


Here's the backside, all the chinking is done here, downspout, & our meterbase.

The dirt guys came back & finished some final grading, & Brad & Travis came out on Saturday & finished off the last of the heating & cooling stuff. Getting close to rough-in inspection time!


After another weekend of chinking we'll be done the outside, then to finish off the gable ends.

Saturday, August 9, 2008

Scaffolding & chinking....

We're finally getting to the second story height for the outside chinking, so we converted on of our 32' extension ladders to a set of scaffolding walkboards. Took them apart, which gave us two 16' sections. Just long enough to go from the center out, & overhang past the overdangles.

We put some 3/8" plywood over the rungs & used 1-1/4" pipe clamps from the backside to secure the wood but not damage the ladder, & added some brackets to sit on the ladder jack:

Then we lifted the end of the walkboard up to the overdangle, tie it on so it couldn't slide off, then used a rope to lift the center up to the ladder jack. We also strung up a safety line behind us as extra precaution:

Here's Jessica working on the chinking...

Wednesday, August 6, 2008

Security & Electric

Now that we have plumbing & electric in, we have a security system installed. Motion detector + cell backup, hopefully it'll keep everything safe & sound.

Our building inspector wanted any wiring behind chinking to be run in a conduit, here's one of the wall outlets:

Here's one of the bathroom vents...

Here's some of the pex & some electric for the upstairs bath.

We're getting close to our rough-in inspection. Just have to pick out some stair railings & get them installed.

Wednesday, July 16, 2008

Plumbing

The plumbing has started and we are quite happy with the progress. We found a local plumber that was recommended by a neighbor. It is amazing how much faster you can get things done when you pay someone else to do it. He will be completed on Friday, then the electrician starts on Monday.

This is work completed Monday and Wednesday.


Here is a picture of the main drain running to the Septic.

Here is the washer dryer hookup and drain

Master Bath

Tuesday, July 8, 2008

Some new pictures...

We are working on finishing up the stairs, got the landing mostly built, just needs a bit more sanding & stain/finish.
Tim helped us get the stairs in place & the landing framed.

Just have to find a railing for the stairs & along the edge of the open second floor area.


Here's our first floor shower/tub. This one squeaked in through the door rough opening just barely.

Here is the master shower/tub, got a good deal on this one & it even has the jetted whirlpool in the bottom, nice!
We used some lifting straps & a chain hoist to get this unit upstairs, same setup as the 4x10's, but this one didn't fit through the doorway for some reason, so we cut out a couple studs & got it into the bathroom.

Sunday, June 22, 2008

Septic + Loft framing

We finally got a week of no rain so things started to dry out. Our dirt guys got out to our place & completed most of the septic system. All the fingers are in, as well as the 1500 gallon tank.

Just waiting for the inspection which should happen tomorrow, then they can backfill everything & landscape around the yard.

Here' the tank:

Here's a picture from the second floor, this is the distribution tank (I think that's what it's called?) & the fingers going out to the drain field.

Here's about half of the fingers:


Jessica & I finished framing in the loft area now that the furnace & duct work is mostly done up there.

Friday, June 20, 2008

We finally have doors

It was a bit of a learning curve getting our doors installed.
They're kind of like windows, but bigger, heavier, & a pain to get lined up properly. They do work perfectly though so we're happy.

Here's the side door that will go out to the porch someday.


Here is our front entry door with the hardware installed too.


We're planning to put some nice wide trim around the door & window bucks in the future.

Sunday, June 15, 2008

Chinking (Day 1)

We started on the chinking this weekend to give us a change from stuffing insulation. It doesn't go quite as quickly as insulating & nailing. We are using the mortar recipe recommended on the log forum, we were able to get ~ 1 -1 1/2 rows completed per mixture. LHBA member JAK (Joe) came down with his family from Illinois to help for all of Saturday & a few hours on Sunday
(Thanks!!!! Help is greatly appreciated & was good meeting you guys). With their help & Tim's we were able to get the first 5 row completed on each side.


How's this for a chinking assembly line?


Here's Tim working on the corner


He did such a good job that we gave him that job for the weekend!


This was another visitor on Sunday morning.

Sunday, June 8, 2008

Chinking nail video....

Tim & Shawn came out to help us today, more insulating & chinking nails.

We couldn't get down to the house Saturday because of flooding all throughout mid Indiana. We were lucky to be on higher ground, our crawlspace was full of water, but no damage to anything.

Here's Tim working on the backside of the house....only 4 more rows to go!


Here's a video using the Paslode framing nailer with the extension tip that Rod welded up for us.

video

Sunday, June 1, 2008

Chinking nails, insulation, framing nailer tip

Since the stain is done on the outside of the logs, we are able to finally start sealing the gaps between the logs.

Many people use the new synthetic chinking, but it's way too pricey & it doesn't breath as well as Portland cement/lime mix.

Since we are not using synthetic stuff, the mortar needs something to hold it between the logs. That means we are putting in a nail every 2 - 3" between every row of logs, inside & out.
We figure it will be around 17,000 nails.

Doing these by hand would take until 2012, so we had a LHBA forum member Rod weld an extension tip onto the framing nailer. This lets the nailer run at full air pressure, but it leave the nails sticking out about 1-7/16", so we'll end up with an approximate 2" chink line.

This is the original Paslode tip:


Here's the new tip with a 2" piece of gas pipe welded on (Thanks Rod!!)


& the final result, a whole lotta nails! It went very quickly, about 5 minutes to stuff the insulation in, and about 4 - 5 minutes to do all the chinking nails across a 30' wall.


After a short day, we finished 5 rows on all 4 outside walls.

Stain!!

After a fun week or two of spraying, scrubbing, cleaning, & rinsing the logs, we were finally ready to get them stained.

We ordered a stain called High Sierra (color applewood) made by Sashco. Product went on very well, so we'll see how long it lasts against the weather.

We hired a friend of a friend to come out & do the staining, Don did a good job & very quick too.


Here's a before of the front:

& here's after 2 coats of stain:

We used the same stain to protect the overhangs & all the fascia. Hopefully this will discourage the carpenter bees a bit too.

Sunday, May 25, 2008

Bee's

We have lovely friends who have decided to build a home in our logs. Carpenter Bee's are burrowing holes into the wood and they seem to digging in the highest places...


In order to prevent the bee's from nesting into the wood, you have to plug the hole they are creating with Aluminum foil then caulk it. This is Jeff climbing to the top of the ridge pole in order to fill a hole ~3/8". The top of the ladder was just resting on the ridge pole, as he was climbing you could see the ladder flexing.


Thursday, May 22, 2008

Mowing!

The yard was turning into a jungle with all the rain we've had so far.

Jessica's parents let us use their old riding lawnmower, so I tuned it up & it did it's job very well tonight. (sorry for the fuzzy pic)


Here's a friend I "mowed over", lucky he was burrowed deep in the grass, so I turned him around towards the safe part of the yard.
He was about 6" across his shell....I wanted to bring him home, but we can guess how well that went over hah.

Sunday, May 11, 2008

Stain samples

Jessica & I needed to figure out what stain to use to protect the logs. We ordered samples from 3 different companies (listed below).

Here's our logs (red pine), cleaned but no stain as a reference:


Heres the stain list that corresponds to the sample #'s on the logs:

  1. Sikkens Natural Oak
  2. Sikkens Natural
  3. Sikkens Natural Light
  4. Sikkens Butternut
  5. Sikkens Cedar
  6. Sikkens Teak
  7. Woodguard Honey 2000 NF
  8. Woodguard Honey Base NF
  9. Woodguard Warm Pecan NF
  10. Woodguard Tawny Cypress NF
  11. Woodguard Dark Walnut NF
  12. High Sierra Applewood
  13. High Sierra Tan Pine
  14. High Sierra Bronze Sycamore


We narrowed it down to 12 + 14, so we coated 1/2 a log in each of the remaining samples, and the applewood color (12) really looks to be the best for us.

Friday, May 9, 2008

from Mum & Dad

Love being here at Jeff & Jessica's, and doing what we can to help on their fabulous log house! We'll be back for the House Warming Party!! Love you guys!

Our Canadian Visitors

Jeff's parents come down for a visit this week to help with the house. There is so much work to be done and their help is greatly appreciated.


This is Jeff & his dad laying down the flooring for the loft. They were able to get it finished and will hopefully be able to get the framing complete before they leave.


Here Bob and I are cleaning the tops of the logs. We managed to get 2 sides and 1/2 of the 3rd side done. It was a little scary being that high on the ladder.


Here, Jeff's Mom and I are cleaning the logs. We were using a very strong bleach/cleaner solution, so goggles and rain suites were needed.


Here Jeff is cutting off the last corner of overdangles. It looks so much better.
All and all, today was a very productive day!

Sunday, May 4, 2008

Installing a yard hydrant

Today was fun....digging a hole.
At least we don't have rocky soil so it only took an hour or so to dig the hole deep enough for the hydrant & to get to the water meter connection.

My lovely wife Jessica assisting with the yard hydrant :)


Here you can see the rock in the bottom for the drainage when it's shut off, & the 3/4" supply line to the water meter.


Finished! No leaks, now we have water so we can get the logs cleaned before staining & chinking.

Saturday, May 3, 2008

Loft joists are finished

Finally got back down to the house today (did I mention night work stinks??) & finished off the other 1/2 of the loft floor joists.
Ready for some OSB decking on-top. The bottom will be covered with drywall & the top will likely stay unfinished.

Monday, April 28, 2008

Loft floor joists

I'm working nights this week, so I was able to spend the afternoon at the house.
Got 1/2 the loft floor joists put up. Should be able to finish it off tomorrow.

A view from the back:

Saturday, April 26, 2008

Loft Floor

We worked on the floor of the loft, Tim and Jeff were able to get the (2) 4x10's up for the middle girder. They hung the joist hangers first, then lifted them up and through bolted them to the Ridge Pole Support logs. The 4x10's were quite heavy, but we managed to get them up without the chain hoist.

Here's Tim making sure the girders are secure....hah.


Here's one of the outside rim joists. These are lag bolted the same as our first floor. This way the entire loft is supported by the RPSL's & wall logs. We'll be adding about 450 square feet of loft area/storage with this.


Close up of the 3/4" threaded rod that secures the 4x10's to the RPSL.